ASP.NET MVC Dry UI
Reducing redundancy in ASP.NET MVC Views – There’s more than one way to do it.
DRY (Don’t Repeat Yourself) is a useful mantra when developing maintainable, readable code. ASP.NET MVC (with Razor view-engine) gives you multiple ways to remove unnecessary redundancy in your views.
Approach 1: @helper Methods
Although the @helper method syntax has been around a while and some of the other approaches below are more prevalent, @helper methods are still supported and may be a good solution for small bits of reusable view code.
The @helper method syntax gives you the ability to package up a section of markup and embeded C# server-side code in a reusable function that can be called from the view. When embedded in the view page itself it also has access to any of the page’s variables (including the Model).
Consider a view that contains three buttons, each of which has:
- A title
- Some explanatory text
- An icon
- A CSS class to apply colors
- An MVC action that should be called when clicked
The desired output looks like this:

And here’s the markup to create it:
HelperInPage.cshtml
|
|
It’s pretty clear there is a lot of repetition going on here.
At the bottom of the view we can make use of the @helper syntax to create a re-usable function:
|
|
Which simplifies our buttons down to this:
|
|
Approach 2: @helper Methods – Shared in App_Code
Helper methods don’t only have to live in a single view page. If you have a snippet that should be shared you can store this helper method definition in a Razor view page under App_Code.
- Create a directory “App_Code” directly under the solution root (if it doesn’t already exist)
- Create a file “MyHelpers.cshtml” for example.

Move our ActionButton helper to the MyHelpers.cshtml page.
Note
One minor down-side of placing a @helper method in App_Code is that the UrlHelper and HtmlHelper classes are not available. You can overcome this in a couple of ways, but the simplest is to just pass in the Url helper from the caller.
App_Code/MyHelpers.cs
|
|
Which gives us this slightly modified usage in the view.
HelpersInAppCode.cshtml
|
|
You can find more information about ASP.NET helper syntax here: Creating and Using a Helper in an ASP.NET Web Pages (Razor) Site
Approach 3: Partial Views
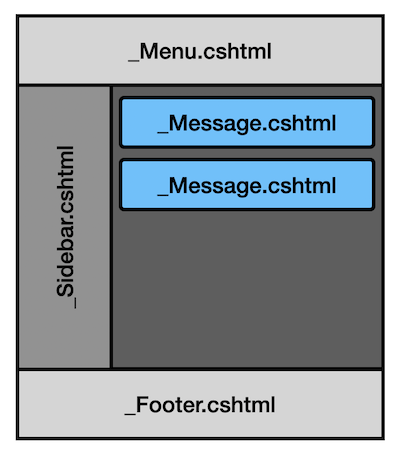
Partial views are .cshtml pages that are not used on their own, but are instead included as part of another page. One great use is for breaking apart a complicated or large page in to more managable units – rendering the Menu Bar, Side Bar, and Footer as separate components, for example.
Partial views can live either under a specific View’s directory, when used to decompose a complicated view in to smaller units, or under the Views/Shared directory, when used in multiple views. Partial views are named with a leading underscore to differentiate them.
One common use for partial views is to extract the common, repeated portions of a site (such as the main menu, sidebar, and footer) and refer to them in all pages. The main _Layout page is also a partial view.

As a simple example, consider a reusable partial view that renders messages.

Create a view model to contain information about the message to be displayed, and store it under the Models directory.

Models/MessageViewModel.cs
|
|
Create the partial view under Views/Shared so it can be re-used across pages.

Views/Shared/_Message.cshtml
|
|
The _Message partial view can then be used to render messages.
@Html.Partial("_Message", new MessageViewModel
{
    Title = "Warning",
    Message = "The supplied machine ID is not valid.  Please check " +
        "the value and re-submit.",
    CssClass = "bg-danger text-light"
})
Approach 4: Display and Editor Templates
Display and editor templates are similar to partial views with a couple of differences.
- By convention they live under Views/Shared in DisplayTemplates and EditorTemplates directories
- Rather than using Html.Partial(), they are included using Html.DisplayFor() and Html.EditorFor()
- They support model binding

For example, consider an editor template used to edit percentages. We’d like it to bind to integer values from the model, and use Bootstrap 4 css classes for styling.

We can declare the editor template in the shared editor templates directory.
Views/Shared/EditorTemplates/Percent.cshtml
|
|
To use the template we’d call EditorFor with and bind to the model attribute containing the int value.
@Html.EditorFor(m => m.BatteryChargeLevel, "Percent", null)
Conclusion
Because ASP.NET MVC and the Razor view engine gives you so many choices it is sometimes hard to choose the right way to re-use UI code. Hopefully the above examples will help you choose the best fit for each situation you encounter.